
Latest
Directions for making paper sculpture masks!
Basic directions for creating paper sculpture masks:
1. Use cardstock. Bright colors and black. Black cardstock is a great foundation for color pencil work and background for bright color attachments.
First decision: pick a sheet of 8 1/2 x 11 inch color cardstock. It is always fun to see what color different children pick. Cardstock can come in such intense colors.
2. Fold your piece of cardstock in half: will you be a long face (like a hotdog) or a wide face (like a hamburger)?
3. From one of the corners of your folded cardstock to the opposite, diagonal corner, tear or cut the paper. Tearing leaves an organic rough edge, cutting leaves a smooth sharp edge. When you open your folded paper you should now have a basic triangular shape. The beginning of a face!
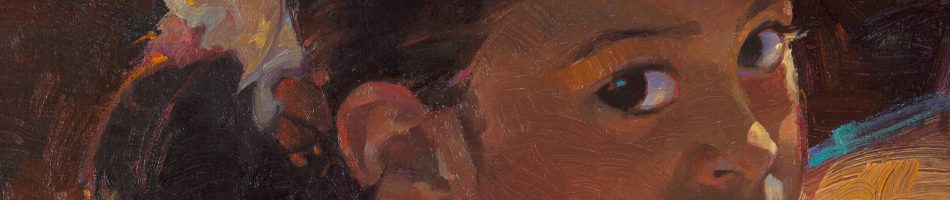
4. Poke holes in your mask where you want the eyes to be. You can do this with a pair of pointed scissors by drilling carefully into the cardstock. With a little hole poked you now have room to insert your scissors or fingers and cut or tear an eye shape.
5. Paper and cardstock can CURL as well as bend, fold, twist, crinkle! Look at your left over pieces and also pick some other color pieces of cardstock to experiment with. They can be attached to your basic mask shape with a glue stick or hot-glue gun.
6. Get into your craft supply box and also decorate with feathers, glitter, rope, trim, etc. Colored pencils on cardstock create some great tapestry and texture.
7. When you are done you can display your mask on the wall or bulletin board with push pins. It is important to pin one side of your mask to the wall and then bend the mask a bit at the fold before you pin the other side. This gives a 3-D look to your paper sculpture mask. Don’t hang it FLAT against the wall. A 3-D mask is more interesting as light in the room casts shadows and accentuates shapes.


Art buddies forever! Me, Barb Edwards, and Roxane Pfister at our Sep 15th Garden Art Show and Sale.

We have known each other since before middle school in Idaho. We have travelled the road of college, family, and ART together. This year we all three turn 60. I say YEAH for the precious decade ahead and to friendships that last and last and last . . .

Posters and cards we sold at our Garden Art Show and Sale, Sep 15. Some still for sale!

Rox and I entered the marketing world of posters and cards at our Garden Art Show and Sale.

Garden Art Show and Sale, September 15, 2012.

The view, walking up the driveway to meander through the art show in the beautiful backyard.

- Left to right: Barb Edwards, Roger Motzkus, Glen Edwards, Jess Humphries.

- Under the canopy, waiting for the artists to chat: Anna and Susan Lofgren (left), Kay Collett and Jess Humphries (center), and my dear brother, DJ, (right).

- Happy art buyer, Carole Jensen, showing some of her purchases. Dear friend from our days in California.


In the ever changing economic landscape, I, an artist who still needs to pay the electric bill, am shifting my art life in the experiment of “staying alive” while joyfully and “boldly going where” I have not gone for a while. I am the proud teacher of 3 enthusiastic and determined students. One is a private lesson on Thursday mornings and the other two are taught jointly on Wednesday mornings. Although I am still doing the occasional illustration job, I have combined forces with my good friend and fellow artist, Roxane Pfister. We had the pleasure and work of presenting our art to friends and family on September 15, 2012 in a Garden Art Show and Sale. IT WAS LIKE A GREAT BIG HUG OF ENCOURAGEMENT as Rox and I contemplate going on the road with our art show. The event was held in the beautiful backyard of my parents, Jess and Verna Humphries, in the Holladay area of Salt Lake City. We learned some valuable lessons, like: NOT spending so much money on snail mailed invitations that weren’t as effective as we’d hoped, it takes time and a crew (mom, dad, brother, nephew, niece) to set up-so allow plenty of time, the initial expense of display easels and tablecloths is necessary for start up, and having a wide range of prices (including inexpensive posters and cards) is a good way to go. The weather was great (no wind to knock things around). We had a variety of “events”: silent auction, drawing for 2 free 6×8 oil paintings, artist chat (discover your PRIORITIES, establish a STRUCTURE, and NEVER give up-NEVER surrender), and my mom’s homemade wheat bread along with other light refreshments. The event, which lasted from 3 to 6pm, was a heartfelt sendoff on the art adventure road by those dear to us.

The fancy invitation. Yes, we are plucky and courageous.
Some of the outdoor paintings from the most excellent adventures.

Valley of Caves, along the Kolob Reservoir Road, May 29, 2012.

- Barracks Canyon, Mount Carmel, June 5, 2012.

- North side of Zion National Park, on a ledge a ways from Kolob Reservoir Road, June 29, 2012.

- Along that same Kolob Reservoir Road on the way to Zion National Park, July 3, 2012.


